
Set out the pieces and supplies
2537 is an intermediate knit project, with XS–4XL in the detailed chart. Test the body fabric, needle and stretch stitch together. Check the cuffs and hem fabric for recovery; use suitable rib where the pattern calls for it.
Use the 2537 product information and the pieces for quantities and allowances. This guide follows a plain hood opening without a drawcord. Keep the hood shape and neckline marks unchanged.
For size M, the maker's chart lists 53.5 cm in the front-zip row. It does not define the top and bottom measuring endpoints or establish the required zipper type. Treat 53.5 cm as a source-table reference, not a purchase-ready zipper specification. Before buying, confirm the selected size, finished opening length, top-stop position, bottom-stop position and zipper type. The short notes also mention easing a shorter zip without explaining those endpoints. Send those five fields and a photograph of the front piece through account messages if the specification is missing. Keep the front untrimmed until it is confirmed.
Make a seam checklist
Copy these pairs onto your working pattern. The letters are the references used in the 2537 notes; locate them on your size before sewing.
- Q: front panel join; inspect the seam before adding the specified 3 mm topstitching.
- W: front body side edge to back body side edge.
- A: the two underarm edges of each sleeve.
- E: sleeve raglan edge marked E to body raglan edge marked E.
- R: the other sleeve raglan edge, marked R, to the body edge marked R. Keep E and R as separate pairs; do not join them to each other.
- D to S: joined and folded cuff to sleeve edge; divide the required stretch between matching marks.
- H: outer hood opening to inner hood opening.
- J: front facing to back-neck facing.
The maker’s sequence joins W, then A, then the E and R raglan pairs. The M cutting pages carry these letters; confirm the same letters on your selected size. Check each pair’s allowance and notches before sewing. The hood and facing connections below still need their neckline edges open.
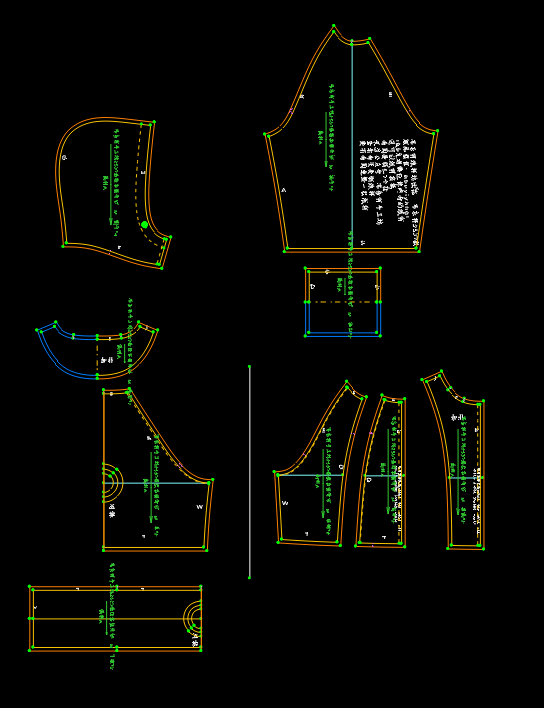
In the layout, the sleeve is above the body pieces. A marks its two underarm edges. W appears on the lower side edges of the front and back body. The front raglan uses E; the back raglan uses R. Match the same letter on the sleeve. Allowances and notches must be read from the selected-size cutting file.
Keep the hood layers separate at the neckline
Sort the four hood pieces into an outer pair and an inner pair. Join each pair separately, then place the two hoods right sides together and sew the opening at H. Turn, press and check that the lining sits inside without twisting.
Keep both neckline edges free. The outer neckline joins the body; the inner neckline joins the facing. Remove any temporary basting that held those edges together for a fitting before making the separate joins.
Leave the hem ends at the front opening
Identify the hem band's front ends, fold, outer layer and inner layer. Keep its centre-front ends separate. Baste the outer hood to the body and the outer hem layer to the front sections, leaving access for the zipper tape, facing and inner hem layer.
Turn the hem into its finished position for a check. Both front corners should reach the intended zipper levels without pulling the body out of shape.
Baste the zipper and compare the fronts
Baste one tape to the front, keeping the neckline, panel seam and hem-band seam at their marked levels. Close the zipper and transfer those levels to the second tape before basting it in place.
Lay the garment flat with the zipper closed. The horizontal seams should meet and both fronts should lie smoothly. If they do not, release the affected basting and compare the opening with the zipper specification for your size. Keep the facing and inner hem layer accessible until the alignment is right.
Check the inner connections before closing
Join the front and back-neck facings at J. Match the inner hood neckline to the facing neckline and the lower facing to the inner hem-band layer. Baste with the garment turned into its finished position, checking that the facing encloses the zipper tape and front allowance without a twist.
Follow the marked pieces for the final turning and finishing order. Check the front corners, hood movement and zipper operation before topstitching.
Frequently asked questions
Why do the panel seams miss each other across the zip?
Close the basted zipper and compare the marks on both tapes. Correct the affected section while the facing is still free, then close it again to check.
Which hood edge must stay accessible?
Both neckline edges need separate joins. Label them outer-to-body and inner-to-facing before turning the hood so the two routes stay easy to identify.